| Issue |
Mechanics & Industry
Volume 21, Number 5, 2020
|
|
|---|---|---|
| Article Number | 501 | |
| Number of page(s) | 13 | |
| DOI | https://doi.org/10.1051/meca/2020047 | |
| Published online | 09 July 2020 | |
Regular Article
Optimization of transversal flow stress and strain and weld seam microstructure analysis in butt-HDPE friction stir welded plates
1
Laboratoire, Mécanique, Productique et Energétique, LR18ES01 (Ex. UR-MSSDT) Ecole Nationale Supérieure d'Ingénieurs de Tunis, Tunis University, 5, Av. Taha Hussein, 1008 Montfleury, Tunis, Tunisia
2
Department of Polymer Engineering, Faculty of Mechanical Engineering, Budapest University of Technology and Economics, Muegyetem rkp 3, 1111 Budapest, Hungary
3
Laboratoire, Mécanique Appliquée et Ingénierie, LR-11-ES19, Ecole Nationale d'Ingénieurs de Tunis. El Manar University, ENIT - BP 37, 1002 Tunis Le Belvédère, Tunis, Tunisia
* e-mail: This email address is being protected from spambots. You need JavaScript enabled to view it.
Received:
6
November
2017
Accepted:
9
June
2020
Abstract
The paper aims to optimize the characteristic performances of friction stir welding of high-density polyethylene in order to predict failure modes in weld nugget and interfacial zones. Three replicates of a face central composite design are employed to estimate the effects of parameters process, on the transversal flow stress and strain of the seam and to understand root causes, which may lead to structural defects such as the onset of cracks and the seam-base metal rupture. The study findings disclose that maximum responses are obtained when the tool rotation speed is set middle and both the feed rate and the plunged surface are set high. The transversal flow stress of the welded seam is found highly sensitive to the plunged surfaces and at a lesser degree to the rotation speed, whereas, the transversal flow strain of the welded seam is mostly sensitive to the rotation speed and at a lesser degree to the plunged surfaces. For the microscopic analysis, it is shown that at low rotation speed, there exist four structural layers in the transition zone between the seam and the base material giving rise to the formation of a continuous line of cracks that can initiate structure failure.
Key words: Mechanical properties / friction stir welding / high-density polyethylene / transition zone / defect morphology
© AFM, EDP Sciences 2020
1 Introduction
Friction stir welding (FSW) has been largely embraced by the industrial and research community. The process has been found to be effective in permanent assembling of plates and sheets of different materials and geometries [1]. Mainly, the FSW thermal energy develops while the parts material is softened and stirred with the solid metal [2]. Even though, much research has dealt with similar and dissimilar metallic materials, only little work has considered polymers. Unlike metallic materials, polymers have low thermal conductivity, low melting temperatures and double yield points [3]. Moreover, the heat generated during polymers stirring does not spread/dissipate uniformly resulting in a localized hot spot and ejection of material from the stirred zone. This can create weld flaws such as cracks and voids. Strand [4] claimed that during the welding process of polymers, the shorter chains can reach their melting points, whereas the longer ones might not. Also, polymers have different thermal conductivity, melting point and hardness [5]. Accordingly, conventional FSW systems and tooling are inappropriate for welding polymeric materials. Nelson et al. [6] designed apparatus for welding thermoplastic materials with a special stir welding system. The system uses a rotating pin/shoulder and a preheated shoe to boost the generation of the thermo-mechanical energy. Strand [4] devised a tool having a stationary shoe, a rotating pin and a heater that is located at the pin back. We designed in previous work [7] a low thermal conductive scraper at the bottom of a static wooden shoulder in order to homogenize temperature distribution in the weld seam. Eslami et al. [8] tested different materials and geometries of shoulders so as to analyze the quality of welds as well as their appearance. It has been found that stationary shoulders made out of polymeric materials give the best results. Also, major produced welds had unsatisfactory bonding along the retreating sides in comparison with the advancing sides, which is difficult to distinguish from the base material (BM). Vijendra et al. [9] developed an original hybrid process using induction heated tool (i-FSW) for thermoplastics welding. The process proved superior when welding amorphous polymers (e.g., acrylonitrile butadiene styrene) and semi-crystalline polymers (e.g., polypropylene, polyamide and polyethylene). They demonstrated the i-FSW technique through welding of high-density polyethylene (HDPE) plates. Formation of the transition zone is found directly related with the heat distribution pattern and the morphology of thermoplastic welds. The existence of a larger transition zone, at lower rotation speed, indicates an extensive change in the structure of the weld material and engenders a crystallinity drop to 13%. The microstructure examination reveals that the strength of the FSWed joint is close to that of the BM when the overall width of the transition zone is small with less complex morphology. Bagheri et al. [10] studied the influence of the rotational speed, the shoe temperature at the beginning of the weld process and the tool feed rate on the weld tensile strength and the structural uniformity of FSWed Acrylonitrile Butadiene Styrene (ABS) sheets. The study points out that welding whilst the rotation speed and the shoe temperature are set to the experiment high levels, and the tool feed is at low-level increases the weld tensile strength. Also, because of dissimilar material flow in the advancing and retreating side of the welding samples, a lack of material on the retreating side of the weld happens and results in a brittle failure in that area. Mendes et al. [11,12] present two studies on FSWed ABS plates. The studies show that the weld appearance and the mechanical properties of the welds produced in robotic system, that is, using tool with stationary shoulder and an external heating system, are similar or even better when compared with those produced in FSW machines. For the latter, the micrographs of the FSWed cross sections portray presence of cavities on the retreating side and lack of bonding, which extends through the plate thickness. The microstructure analysis of welds produced in the robotic system, however, indicates the defects extend along the entire length of the weld (external defects) as well as through the thickness (internal defects). Kiss et al. [13] investigated the morphology of seams in FSWed polypropylene (PP). The microscopic analysis shows that, during FSW, the lower welding rotation speed gives rise to a border transition zone of more complex feature in contrast to higher rotation speed. Moreover, the width of the transition zone reduces to about half in FSW with high rotation speed. In the central parts of the seam, spherulitic structures are visualized that are similar to those of the BM. At the borderline of the seam, a complex super-molecular structure is observed. The central spherulitic structure is due to the relatively slow cooling rate in the seam central part. The study concludes also that the strength of the FSW seam is close to that of the BM proviso the overall width of the transition zone is small with a lesser complex morphology. Prasad et al. [14] experienced butt-FSW of polypropylene, which is reinforced with Al2O3 nano composites. The study indicates that at higher rotational speed and shoulder temperature, the tensile and flexural strength increase, noticeably. The micro-hardness and the ultimate tensile strength improvement for samples with 10% nano Al2O3 have been recorded as well. It is concluded that the good distribution of reinforcement alumina particles is accountable for such an improvement. Sharma et al. [15] studied the tensile and impact strength of FSWed polypropylene (PP) depending on the tool rotation speed, the feed rate and the tool diameter. The study finding establishes that the tensile strength of the FSWed joint is about 80% of that of the BM at optimal parameters setting. Jaiganesh et al. [16] investigated the tensile strength and the microstructure of FSWed 5mm-HDPE plates. Tensile and macro tests conclude that lower strength is observed on the back side of the weld, so, the breakage was initiated from the point on the rear side of weld specimens. Furthermore, the study discloses presence of a pealing like structure during FSW and discontinuous blow holes for lower rotational speed. Lenin et al. [17] optimized the rotation speed, the feed rate and four tool pin profiles for FSWed polypropylene (PP) material. Minimum defects occur in high rotation speed using threaded pin, however, countless of cavities, porous, burrs and blow holes occur in low rotation speed and square pin. Panneerselvam et al. [18] consider FSW of polyamide (nylon 6) material when a threaded pin is monitored in clockwise and anticlockwise directions. Anticlockwise FSWed joints are defect free with better material properties. However, clockwise joints present blow holes, poor contacting of nugget with the BM and semi-solid state material deposition. Husain et al. [19] studied the tensile and the impact strength of FSWed polyamide (nylon-66) sheets under varying processing parameters. The study outlines that the weld strength increases first, and then decreases when the rotational speed rises continually. The strength decreases, however, when the feed rate increases. A weld maximum tensile strength of 8.51 MPa is achieved representing about 55% of the BM strength, while the impact strength of the best experienced weld is about 30% of BM. Zafar et al. [20] explored the FSW of polyamide (nylon-6) plates by investigating the effects of the rotational speed on the micro-mechanical properties, flow behavior and thermal variations. Due to its low melt viscosity, the nylon 6 proved weldable only at lower rotation speed. At higher rotation speeds, compression of the excess plasticized material and the defects formation in the weld zone are observed. The differential scanning calorimeter (DSC) results shows that the crystallinity of the weld zone decreases compared to BM. Moreover, the retreating side has lower crystallinity compared to the advancing side. During tensile tests, all specimens fractured at the interface of the weld zone on the retreating side. This can be attributed to deficiency in bonding at the interface of the weld zone and lower crystalline content on the retreating side. Simoes et al. [21] investigate FSW of PolyMethyl MethaCrylate (PMMA). It is found that due to the polymers rheological and physical properties, the FSWed zone experiences different material flow mechanisms and weld defect morphologies. Also, the cross section of the polymer weld shows two zones instead of four as for metallic welds. The high transparency of the PMMA makes it easier to analyze the morphological changes, which is induced by the welding process. At low temperature, investigation of the welds does not report important discontinuities at both advancing and retreating sides, however, when the same welds are observed one month after two thin cracks are observed resulting from the residual stress field located at the advancing and retreating sides of the weld. According to a recent literature review [22], it is found that for FSW of most polymers (Nylon-6, PVC, ABS, PMMA, PP, MDPE and UHMW-PE), the joint efficiency (i.e., the ratio of strength of weld joint to the strength of BM) ranges from 11.87% to nearly 100%, whereas, for HDPE parts, the joint efficiency is between 70% and 95.60%. Sachinkumar et al. [23] experienced the mechanical properties of butt FSWed HDPE sheets. The experimentation is replicated four times and the seam maximum tensile strength is found between 63% and 101% of the BM. The average culminates to 75%. Even though, the authors have not argued about the sources of fluctuation, it is likely that fluctuation emanates from room temperature instability during tensile tests [24] and FSW. Hoseinlaghab et al. [25] studied the effects of rotational speed, feed rate, tool geometry and the tool tilt angle on the weld strength and creep behavior/resistance of FSWed HDPE plates. It is found that the weld quality and creep resistant of samples decreases with increasing tool tilt angle, meaning that a tool with 0° tilt angle is advisable. Also, the study showed that cylindrical pins are preferred to conical pins.
As it has been laid out above, numerous research works have tackled characterization of the mechanical and metallurgical properties of weld seams produced in FSW. This has concerned major engineering materials, especially, ferrous/nonferrous alloys, ceramics and polymers and has concerned design functionalities such as surface integrity and commissioning of rigid and deformable structures.
The paper is organized into two parts: optimization of two process responses, i.e., transversal flow stress (σFT) and strain (εFT) and a microstructure analysis of the weld seam and the weld/BM interfacial properties. The optimization study uses a response surface methodology (RSM) to determine regression models pertaining to the process responses as function of independent process parameters: rotation speed (N), feed rate (F) and tool plunged surface (S). This has been conducted using a face central composite design (FCCD) strategy. It is worth noting that for the statistical analysis, because the ±α factors levels are unfeasible due to the mill operating parameters limitation, a FCCD has been adopted instead of usual rotatable central composite design CCD [26,27]. From now on, we shall refer to the transversal flow stress and transversal flow strain responses as (σFT) and (εFT), respectively.
Following, the paper text is organized into four sections. Section 2 lays out the experimental set-up and the DOE strategy being employed for the study. The statistical analysis including the optimization and the sensitivity analyses of the process responses (σFT) and (εFT) are given in Section 3. In Section 4, a microscopic analysis of the weld transition area is conducted to predict hypothetic failure modes in weld nugget and interfacial zones. Finally, the conclusion will sum up important findings and recommendations for future work.
2 Experimental set-up and DoE strategy
2.1 Experimental set-up
The equipment used in driving the tool for the FSW process is a 7 kW powered Momac universal mill machine (Fig. 1a). The tool body (Fig. 1b) is made from steel bar (NE C48) and a (150 mm × 70 mm × 30 mm) low thermal conductivity wood scraper (Fig. 1c) thereby preserving the heat generated from friction and helping obstruct blisters defects. For the experimental apparatus, 3 × 18 pairs of commercial plates of HDPE (ISO 1043) sized 100 mm length ×80 mm width ×15 mm thick are cut. Then, the butt-FSWed specimens are cut transversally to the processing direction.
All FSW tool dimensions are kept constant excepting the pin diameter (Fig. 1b). The tool has right-hand threaded pin profile. Three diameters M10 × 1.5, M12 × 1.75 and M14 × 2 were used in this study. Where “M” indicates ISO Metric Thread “and “10”, “12” and “14” indicate the major diameters of the thread and “1.5”, “1.75” and “2” are the respective pitch of the tread. The tool plunged surface S is chosen as a main factor because it characterizes the actual friction surface between the pin and the material to be welded. It is calculated based on the surface of one thread S/th = S1 + 2S2 + S3 (Fig. 1b) multiplied by the total number of threads corresponding to the plunged pin length (14.5 mm). S/th depends on the ISO thread dimensions.
The pressure exerted on the wood scraper is kept constant. This is achieved by controlling the penetration depth of the pin (14.5 mm) into the interface of the plates to be welded as shown in Figure 1c. The width of the scraper (70 mm) is an important setting; it acts as a mechanical stop to ensure constant pressure on the weld seam (Fig. 1a). Figure 2 displays a chart showing the tensile specimen cut in the transverse direction, respectively. The stress-strain relationship is determined using a computerized E0015 universal tensile machine (max. capacity 200 kN) at 5 mm/min speed. The process responses, (σFT) and (εFT) are measured at the first yield point of the HDPE material corresponding to the strain point lower than 50%.
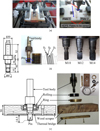 |
Fig. 1 (a) Experimental set up of the FSW process. (b) Tooling geometry. (c) Tool system. |
 |
Fig. 2 (a) 3167 ISO tensile specimen. (b) Schematic of the tensile specimens in transverse direction of FSW joint. (c) Broken test specimen (Run 3). |
2.2 Etching procedure
The transition area structure is analysed using scanning electronic microscopy (SEM, JEOL-JSM5400). The samples thus cut using a Bright 3500 microtome with thicknesses of 10–15 µm and width 4 mm. In order to visualize the supramolecular structure; the same protocol developed previously by Kiss et al. [13] is applied. The etchant is potassium permanganate dissolved in a mixture of sulfuric acid and phosphoric acid. The acidic medium etches first the amorphous part of the surface of the specimens immersed into the etchant, thus the residual crystalline parts (spherulites) become observable. After etching, the samples were first rinsed with diluted sulfuric acid then with hydrogen peroxide and finally with distilled water.
2.3 Design of experiment strategy
For experimentation, a FCCD strategy is implemented to evaluate experimental runs pertaining to (σFT) and (εFT) based on the process factors, i.e., rotation speed (N), feed rate (F) and plunged surface (S) settings. The experiment is conducted in a sequential way, that is, first a first-order 2^3 full factorial plan is executed and analyzed, next, as we suspect curvature and/or lack of fit discrepancies, the design would be augmented by four center points and six axial points to estimate quadratic terms of the regression models of the system responses, (σFT) and (εFT). As many studies [3,24,28–31] have outlined that the mechanical properties of the HDPE are sensitive to the room temperature. Presently, the experiment temperature varies from 5 to 40 °C, thus, the 18 runs of the FCCD design are replicated thrice with blocking. To ensure superior sensitivity and reproducibility of the process responses, a series of preliminary trials is executed to find out appropriate factor setting. Table 1 gives the factors region space as considered in the experiment.
Table 2 gives the experimental FCCD layout with regard to the (σFT) and (εFT) responses. Henceforth, the statistical and sensitivity studies are performed using MinitabTM and Crystal BallTM software's.
Levels of the three processing factors (N, F, S).
FCCD experimental layout for the FSW responses, (σFT) and (ɛFT).
3 Statistical analysis
3.1 ANOVA and regression models for (σFT) and (εFT)
The ANOVA Tables for the full factorial 1st order models (N, F, S, N × F, N × S, F × S and N × F × S) show a LoF (p-value 0.003 for (σFT) and p-value 0.037 for (εFT)) as well as presence of curvature in the process responses (p-value 0.000 for (σFT) and p-value 0.000 for (εFT)). The analysis is performed at 5% of significance level. The models LoF and curvature discrepancies hold true regardless whether the center points are considered or ignored. Therefore, a quadratic model is needed. The ANOVA Tables of the reduced quadratic models for (σFT) and (εFT) are given in Table 3, thus, at 5% level the (F, S, N×S, F×S and N^2) and (N, S, N×S and N^2) models are maintained for (σFT) and (εFT), respectively.
The four in one plots of the reduced models of (σFT) and (εFT) shown in Figure 3 do not show major concern as to the residuals normality and variance, however, the normality and the variance assumptions are barely broken regarding the (εFT) response. A log transformation of (εFT) and a log-log transformation of the (εFT) and S factor result in a small improvement in terms of std = 0.13, R-sq(adj.) = 67.36% and R-sq(pred.) = 55.09. And, adversely, the residual normality has worsened. Therefore, the untransformed models are retained. As it is shown, in Table 3, the models performances are std = 3.34, R-sq = 73.58%, R-sq(adj.) = 68.88% and R-sq(pred.) = 61.35% for (σFT) and std. = 0.03, R-sq = 63.60%, R-sq(adj.) = 60.63% and R-sq(pred.) = 56.24% as to the (εFT) response.
The regression equations of the reduced models (σFT) and (εFT) in coded and actual units follow: (1)
(1)
 (2)
(2)
 (3)
(3)
 (4)
(4)
In Figure 4, the N×S and F×S interactions plots for the responses (σFT) and the N×S plot for (εFT) are shown. Interestingly, the N×S and F×S plots suggest that maximum transversal flow stress (σFT) is obtained when S is set high, N low and F high. Whereas, the N×S plot indicates that a maximum transversal flow strain (εFT) is achieved when S is set high and N middle. The response (εFT) is found robust vis-à-vis the feed rate factor (F).
Interestingly, when factors N, F and S are set low, high and low, respectively, the transversal flow stress (σFT = 0.155 MPa) and strain (εFT = 0.016) are at the minimum. This corresponds to RUN3 (N = 653, F = 44 and S = 397) in the first replication. The run is repeated twice and σFT and εFT remain unchangeably low. Confirmatively, the weld temperature measured in the third replication (see Tab. 2) indicates that minimum temperature (115 °C) is obtained when the N, F and S factors are set low, high and low, respectively; thus, minimum thermo-mechanical energy is provided. In Section 4, a microscopic analysis of the transition area corresponding to RUN3 will be conducted.
ANOVA Tables of the reduced models of (σFT) and (εFT)
 |
Fig. 3 Residual diagnostic plots to check model adequacy for Flow stress and Flow strain. |
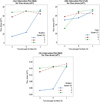 |
Fig. 4 Interaction plots for the (σFT) and (εFT) responses. |
3.2 Sensitivity analysis and responses optimization
The sensitivity analysis is performed using Crystal Ball™ software. In order to ascertain uncertainly in the process responses, (σFT) and (εFT), the factors N, F and S are assumed to vary according to a triangular distribution. For the N, F and S assumptions, minimum value is set equal to the low level factor (coded ‑1), the likelihood value equates the middle level factor (coded 0) and the maximum value is equal to the high level factor (coded 1) as it is given in Table 1. 10,000 Monte Carlo simulations are executed (see printout in Fig. 5).
It is found that the transversal flow stress (σFT) response is best fitted by a normal distribution (mean 21.47 and std. 1.76) with an Anderson-Darling distribution adequacy of 53.46. The transversal flow strain response, (εFT) is best fitted using a lognormal distribution (location 0, mean 0.09 and std. 0.012) having an Anderson-Darling distribution adequacy of 53.46.
With regard to the models sensitivity, the response (σFT) is found mostly sensitive to the plunged surface factor, (S) as it is expressed by the contribution to the variance (91.3%) and the rank correlation (0.93) performances. The contribution is in a direct relationship. To a lesser extent, the model is found sensitive to the rotation speed N, i.e., the contribution to variance is 8.4% and the rank correlation is 0.93. And, it is barely sensitive to the feed rate factor (F). Concerning the (εFT) model, the trends are rather reversed. The (εFT) regression model is highly sensitive to the rotation speed N, i.e., the contribution to variance is 75.8% and the rank correlation is 0.81. And, the contribution is in a direct relationship with the model sensitivity. Variation in the plunged surface S influences the response (εFT), but, at a lesser degree and it is in indirect fashion, i.e., contribution to variance is 24.1% and the rank correlation is ‑0.46. Likewise, the system response (εFT) is barely sensitive to the feed rate F. Table 4 recaps the sensitivity performance indexes for the (σFT) and (εFT) models.
It has been argued earlier that the interaction plots N×S and F×S of (σFT) and N×S of (εFT) suggest that maximum (σFT) is attained when N is set low, F and S high and maximum (εFT) is obtained when N is set middle and S high given that (σFT) and (εFT) are considered solely. The feed rate setting does not account for because of the process robustness. Simultaneous optimization of (σFT) and (εFT) is carried out by investigating the contour plots of N×S and F×S shown in Figure 6. When composed, the plots indicate that maximum (σFT) is about 26.36 MPa and maximum (εFT) is about 0.183. These are obtained for N being set middle and both F and S high.
 |
Fig. 5 Forecast of simulated values for (σFT) and (εFT). |
The sensitivity performance indexes for the flow stress (σFT) and flow strain (εFT) models.
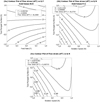 |
Fig. 6 Contour plots of flow stress and flow strain responses. |
4 Microstructure analysis of weld
The weld seam microstructure analysis of the transition zone in RUN3 is performed to understand causes of the low (σFT) and (εFT). Primarily, the microstructure study focuses on the transition area between the seam and the base material.
In Figure 7, a boundary zone between the seam and the BM on the advancing side of the seam can be observed. The structure of the BM (to the right of the boundary line) and the seam itself are similar to each other, while the width of the boundary zone is approximately 40 μm.
In Figure 7a, it can be observed that the supramolecular structure of the seam is rougher compared to the structure of the BM. This is caused by the heating effect of the welding tool and the different cooling speeds and times, i.e., the structure of the BM is formed when the extruded sheet cools down, while the structure of the seam is formed after the welding process. The spherulites inside the seam are also much more fragmented compared to the spherulites observed in the BM. This is confirmed on the magnification (×1500) observed on the electron micrographs in Figure 7b and c. The same finding can be observed on polarized light micrograph in Figure 7d. This phenomenon can be attributed to the shearing-mixing effect of the welding tool in the stirring area.
There is a similarity of the Kiss et al. [13] finding in case of FSWed polypropylene which stipulates that the spherulites of the base material are larger than those found in the seam.
In Figure 8, the boundary zone between the seam and the BM can be seen in 1500× magnification. It contains multiple structural layers which are described from right to left as:
- M:
The original structure of the BM. Unfortunately, the structure is not distinctive enough, although it is probably spherulitic with a mean spherulite diameter of 2–3 μm.
- I:
A sheared material layer, which is created by the peripheral speed of the welding tool. This layer is probably situated right beside where the edge of the welding tool passed by. In this region, the high temperatures created by the welding tool could soften the HDPE BM to such an extent that the material could stick to the surface of the welding tool and form a long, extended material zone.
- II:
The zone where the BM fully melted and flowed due to the even higher temperature created by the welding tool. The crystallization in this material zone occurs in the direction of the shear velocity vector. In this intensively sheared material zone, the forming of the cylindritic structure is induced by row-nuclei (a special version of self-nucleation). Many cavities can also be observed in this region, which are probably caused either by air trapped in the material by the rotating welding tool or by the change in specific volume occurring during the cooling down of the base material after the welding process.
- T:
The line where the very edge of the welding tool passes by during the welding process, effectively the geometric boundary between the seam and the base material. In the immediate vicinity of this narrow zone, a supramolecular structure similar to the structure of the base material and the seam can be observed.
- 2:
The softened zone of the seam, which is formed similarly to the zone marked “II”. Due to the greater heat transfer towards the BM, a transcrystalline structure is formed that is similar to the structure of the BM in the sheared zone (“II”). The spherulites in this layer are distorted and many cavities can be observed.
- S:
Inside the seam, similarly to zone “M” of the BM, spherulites is formed due to the fact that the polymer has high heat insulating capability, thus the material of the seam slowly cools down after FSW making it feasible for crystalline structures to properly form. In the vicinity of zone 2, however, heat transfer towards the BM and also towards the root and crown sections of the seam is more intense, thus regular spherulites could not form. On the other hand, inside the seam, the formation of crystalline structures is nearly uninterrupted.
Layers “I” and “II” constitute the heat affected zone (HAZ) of this welding process. Factors setting in RUN3 can be considered as not adequate regarding heat input, since many cavities formed in the layers marked with “II” and “2”. These behave as defect locations in the material. Under stress, cracks can form near or in these defects. As a result of further stress, these cracks can merge together and form a continuous line of cracks where the material becomes weak and can fail.
Figures 9 and 10 show the front view of the seam in advancing side and retreating side respectively. It can be seen in Figure 9 that the N, F and S setting of RUN3 (N low, F High and S low) are inadequate, as the material, for example near the root of the seam is not plasticized sufficiently and thus the heat input in this area is low (115 °C). The material in this zone is only softened; it remains in a solid phase. In RUN3 we observed the worst flow stress and the lowest measured temperature among all other runs (Tab. 2). This is confirmed by Bozkurt [32] in case of FSWed polyethylene sheets, who indicated that the tensile strength decreases due to the lack of a proper heat diffusion. This may cause clean fracture of the welded part (Fig. 2c). As reported by Sheikh-Ahmad et al. [33] the fracture of FSWed parts is attributed to the lack of fusion between the two abutting plates, caused by relatively low material temperatures and low pressure. To overcome this lack of temperature an auxiliary heat tool is introduced to improve weldability of plastic materials [9].
In Figure 10, similarly to Figure 9, an intermediate layer (240 µm) of only softened material can be seen on the retreating side, which is formed due to relatively low heat input (it was only the mechanical energy of the rotating welding tool that was transformed into heat in the material). This layer can largely deform when loaded with shear stress. Furthermore, many cavities and air bubbles are present in this layer, making it a critical part of the welded product regarding stress and load.
A greatly sheared material layer is formed both on the advancing and retreating sides due to the low rotation speed of the welding tool, which causes a relatively smaller melting effect in the material. This way, the temperature of the material was lower, thus the melt strength of the material was greater, the homogenization of the seam was less adequate and the mechanical quality of the seam was also less favourable.
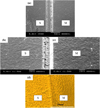 |
Fig. 7 Transition area between the seam and the BM on the advancing side (a), (b) and (c) SEM images. (d) Polarized light micrograph. |
 |
Fig. 8 Multiple structural layers in the boundary zone between the seam and the HDPE BM. |
 |
Fig. 9 Morphology of defect between the HAZ and the BM in advancing side. |
 |
Fig. 10 Morphology of cavities and air bubbles between the seam and the BM in retreating side. |
5 Conclusion
The paper has addressed issues which are relevant to the structure integrity and commissioning quality of the HDPE butt-FSWed plates. The study has been organized into two main parts: an optimization study and a special case microstructure analysis in association with RUN3 giving rise to lower (σFT) and (εFT).
For the optimization study, important conclusions follow:
-
The ANOVA Table of the (σFT) response shows that replicating the experiment at different time periods (January to June) and experimental conditions (room temperature from 5 °C to 40 °C) was found significant at 5% level (p-value blocks 0.2%). That was not the case for the (εFT) response. Experiencing FSWed HDPE and others polymers under different environmental conditions such as severe room temperature is worthwhile.
-
The low Rsq-adj for (σFT) and (εFT) (p-values 68.88% and 60.63%, resp.) and Rsq-pred. (p-values 61.35% and 56.24%, resp.) indicate that the regressions models for (σFT) and (εFT) are partly reflective of the complex phenomena and process parameters, which underlie HDPE FSW.
-
Maximum (σFT) is about 26.359 MPa and maximum (εFT) is about 0.997 mm. Compositely, these are obtained when N is set middle (N = 1280 r.p.m), F high (F = 44 mm mn‑1) and S high (S = 559 mm2).
-
The study of the models uncertainty of (σFT) and (εFT) gives up in adverse alternatives as to the operating factors N, F and S factors. While, the process response (σFT) is highly sensitive to the plunged surface (S) (contribution to variance 91.3% and rank correlation 0.93) and moderately sensitive to the rotation speed (N), the (εFT) response is found mostly sensitive to the rotation speed (N) (contribution to variance is 75.8% and the rank correlation is 0.81). Disturbance in the plunged surface (S) also influences the response (εFT) behavior, but, at a lesser degree and it proceeds in indirect fashion (contribution to variance is 24.1% and the rank correlation is ‑0.46). Thus forth, monitoring the N, S factors about their target values is critical.
For the microstructure analysis of the RUN3, important finding are;
-
The spherulites inside the seam are much more fragmented compared to the spherulites observed in the base material.
-
The boundary zone between the seam and the BM contains four structural layers. Two closed zones constituting the heat affected zone (HAZ) of this welding process. A first zone where the sheared material layer is created by the peripheral speed of the welding tool and, a second zone where the BM material fully melted and flowed due to the even higher temperature created by the welding tool. The third zone presents the geometric boundary between the seam and the BM. The fourth zone closed to the seam corresponds to the softened zone of the seam which is formed similarly to the second zone.
-
On both the advancing side and retreating side, a critical part of the welded product constituted by an intermediate layer of only softened material which is formed due to relatively low heat input.
-
The parameters setting of RUN3 are inadequate; the material near the root of the seam is not plasticised sufficiently due to lack of heat input in this area. The material in this zone is only softened; it remains in a solid phase.
References
- X. He, F. Gu, A. Ball, A review of numerical analysis of friction stir welding, Prog. Mater. Sci. 65, 1–66 (2014) [Google Scholar]
- M.B. Durdanovic, M.M. Mijalovic, D.S. Milcic, D.S. Stamenkovic, Heat generation during friction stir welding process, Tribol. Ind. 31, 8–14 (2009) [Google Scholar]
- N.W.J. Brooks, A.P. Unwin, R.A. Duckett, I.M. Ward, Double yield points in polyethylene: structural changes under tensile deformation, J. Macromol. Sci. B 34, 29–54 (1995) [CrossRef] [Google Scholar]
- S.R. Strand, Effects of Friction Stir Welding on Polymer Microstructure, MSc Thesis, Brigham Young University, Provo, USA, 2004 [Google Scholar]
- S. Eslami, P.J. Tavares, P.M.G.P. Moreira, Friction stir welding tooling for polymers: review and prospects, Int. J. Adv. Manuf. Tech. 89, 1677–1690 (2017) [CrossRef] [Google Scholar]
- T.W. Nelson, C.D. Sorensen, C.J. Johns, Friction Stir Welding of Polymeric Materials, PCT WO 01/85383-A1, USA, 2001 [Google Scholar]
- M.A. Rezgui, M. Ayadi, A. Cherouat, K. Hamrouni, A. Zghal, S. Bejaoui, Application of Taguchi approach to optimize friction stir welding parameters of polyethylene, in EPJ Web of conferences, ICEM 14–14th International Conference on Experimental Mechanics , edited by F. Brémand. EDP Sciences, Poitiers, France, 2010, pp. 113–119 [Google Scholar]
- S. Eslami, T. Ramos, P.J. Tavares, P.M.G.P. Moreira, Shoulder design developments for FSW lap joints of dissimilar polymers, J. Manuf. Process 20, 15–23 (2015) [Google Scholar]
- B. Vijendra, A. Sharma, Induction heated tool assisted friction-stir welding (i-FSW) A novel hybrid process for joining of thermoplastics, J. Manuf. Process 20, 234–244 (2015) [Google Scholar]
- A. Bagheri, T. Azdast, A. Doniavi, An experimental study on mechanical properties of friction stir welded ABS sheets, Mater. Des. 43, 402–409 (2013) [Google Scholar]
- N. Mendes, A. Loureiro, C. Martins, P. Neto, J.N. Pires, Effect of friction stir welding parameters on morphology and strength of acrylonitrile butadiene styrene plate welds, Mater. Des. 58, 457–464 (2014) [Google Scholar]
- N. Mendes, A. Loureiro, C. Martins, P. Neto, J.N. Pires, Morphology and strength of acrylonitrile butadiene styrene welds performed by robotic friction stir welding, Mater. Des. 64, 81–90 (2014) [Google Scholar]
- Z. Kiss, T. Czigany, Microscopic analysis of the morphology of seams in friction stir welded polypropylene, Express Polym. Lett. 6, 54–62 (2012) [Google Scholar]
- R.V. Prasad, P.M. Raghava, FSW of polypropylene reinforced with Al2O3 Nano composites, effect on mechanical and microstructural properties, Int. J. Eng. Res. Appl. 2, 288–296 (2012) [Google Scholar]
- R. Sharma, O.P. Singh, Effect of FSW process parameters on mechanical properties of polypropylene: an experimental study, Int. J. Innov. Res. Sci. Eng. Technol. 2, 7792–7798 (2013) [Google Scholar]
- V. Jaiganesh, B. Maruthu, E. Gopinath, Optimization of process parameters on friction stir welding of high density polypropylene plate, Proc. Eng. 97, 1957–1965 (2014) [CrossRef] [Google Scholar]
- K. Lenin, H. Abdul Shabeer, K. Suresh Kumar, K. Panneerselvam, Process parameters optimization for friction stir welding of polypropylene material using Taguchi's approach, J. Sci. Ind. Res. 73, 369–374 (2014) [Google Scholar]
- K. Panneerselvam, K. Lenin, Joining of Nylon 6 plate by friction stir welding process using threaded pin profile, Mater. Des. 53, 302–307 (2014) [Google Scholar]
- I.M. Husain, R.K. Salim, T. Azdast, S. Hasanifard, S.M. Shishavan, R.E. Lee, Mechanical properties of friction-stir-welded polyamide sheets, Int. J. Mech. Mat. Eng. 10, 1–8 (2015) [CrossRef] [Google Scholar]
- A. Zafar, M. Awang, S.R. Khan, S. Emamian, Investigating friction stir welding on thick Nylon 6 plates, Weld J. 95, 210–218 (2016) [Google Scholar]
- F. Simoes, D.M. Rodrigues, Material flow and thermo-mechanical conditions during friction stir welding of polymers: literature review, experimental results and empirical analysis, Mater. Des. 59, 344–351 (2014) [Google Scholar]
- A. Zafar, M. Awang, S.R. Khan, Friction stir welding of polymers: an overview. In: Lecture Notes in Mechanical Engineering, 2nd ICMMPE, 2nd International Conference on Mechanical, Manufacturing and Process Plant Engineering, edited by M. Awang, Kuala Lumpur, Malaysia, 2016, pp. 19–36 [Google Scholar]
- S. Kumar, V. Panwar, Studies on mechanical characterization of friction stir welded polyethylene joints, J. Emerg. Technolog. Innov. Res. 2, 17–20 (2015) [Google Scholar]
- M.H.H. Es-Saheb, The temperature effects on high density polyethylene (HDPE) pipes, J. King. Saud. Univ. Eng. Sci. 8, 47–60 (1996) [Google Scholar]
- S. Hoseinlaghab, S.S. Mirjavadi, N. Sadeghian, N. Sadeghian, I. Jalili, M. Azarbarmas, M.K.B. Givi, Influences of welding parameters on the quality and creep properties of friction stir welded polyethylene plates, Mater. Des. 67, 369–378 (2015) [Google Scholar]
- R.H. Myers, D.C. Montgomery, Response Surface Methodology: Process and Product Optimization using Designed Experiments, John Wiley and Sons, New York, 2002 [Google Scholar]
- D.C. Montgomery, Design and analysis of experiments, John Wiley and Sons, New York, 2013 [Google Scholar]
- D.V. Reddy, Long-Term Performance of Buried High Density Polyethylene Plastic Piping , Report, Department of Ocean Engineering, Florida Atlantic University, 2001 [Google Scholar]
- N. Merah, F. Saghir, Z. Khan, A. Bazoune, Effect of temperature on tensile properties of HDPE pipe material, Plast. Rubber Compos. 35, 1–5 (2006) [CrossRef] [Google Scholar]
- J. Furmanski, E.N. Brown, B. Clements, C.M. Cady, G.T. Gray III, Large-strain time-temperature equivalence in high density polyethylene for prediction of extreme deformation and damage, in EPJ Web of Conferences, DYMAT 2012–10th International Conference on the Mechanical and Physical Behaviour of Materials under Dynamic Loading, edited by S. Hiermaier. EDP Sciences, Freiburg, Germany, 2012, pp. 1–6 [Google Scholar]
- J.M.L. Reis, L.J. Pacheco, H.S. da Costa Mattos, Influence of the temperature and strain rate on the tensile behavior of post-consumer recycled high-density polyethylene, Polym. Test 32, 1576–1581 (2013) [Google Scholar]
- Y. Bozkurt, The optimization of friction stir welding process parameters to achieve maximum tensile strength in polyethylene sheets, Mater. Des. 35, 440–445 (2012) [Google Scholar]
- J.Y. Sheikh-Ahmad, D.S. Ali, S. Deveci, F. Almaskari, F. Jarrar, Friction stir welding of high density polyethylene − carbon black composite, J. Mater. Process. Tech. 264, 402–413 (2018) [CrossRef] [Google Scholar]
Cite this article as: K. Hamrouni, M.-A. Rezgui, A. Trabelsi, Z. Kiss, R. Nasri, Optimization of transversal flow stress and strain and weld seam microstructure analysis in butt-HDPE friction stir welded plates, Mechanics & Industry 21, 501 (2020)
All Tables
The sensitivity performance indexes for the flow stress (σFT) and flow strain (εFT) models.
All Figures
 |
Fig. 1 (a) Experimental set up of the FSW process. (b) Tooling geometry. (c) Tool system. |
| In the text | |
 |
Fig. 2 (a) 3167 ISO tensile specimen. (b) Schematic of the tensile specimens in transverse direction of FSW joint. (c) Broken test specimen (Run 3). |
| In the text | |
 |
Fig. 3 Residual diagnostic plots to check model adequacy for Flow stress and Flow strain. |
| In the text | |
 |
Fig. 4 Interaction plots for the (σFT) and (εFT) responses. |
| In the text | |
 |
Fig. 5 Forecast of simulated values for (σFT) and (εFT). |
| In the text | |
 |
Fig. 6 Contour plots of flow stress and flow strain responses. |
| In the text | |
 |
Fig. 7 Transition area between the seam and the BM on the advancing side (a), (b) and (c) SEM images. (d) Polarized light micrograph. |
| In the text | |
 |
Fig. 8 Multiple structural layers in the boundary zone between the seam and the HDPE BM. |
| In the text | |
 |
Fig. 9 Morphology of defect between the HAZ and the BM in advancing side. |
| In the text | |
 |
Fig. 10 Morphology of cavities and air bubbles between the seam and the BM in retreating side. |
| In the text | |
Current usage metrics show cumulative count of Article Views (full-text article views including HTML views, PDF and ePub downloads, according to the available data) and Abstracts Views on Vision4Press platform.
Data correspond to usage on the plateform after 2015. The current usage metrics is available 48-96 hours after online publication and is updated daily on week days.
Initial download of the metrics may take a while.


